Wednesday, June 5, 2019

It's time...


Hello, my friends-

I started this business 7 years ago after selling the retail store I ran with my family. I have always loved rubber stamps and the paper craft industry. Paper Wings was a great way for me to stay in the industry while also working from home so that I could care for my two small children. Those children aren't so small anymore. Once they became school aged, I decided to go back to school and finish a degree I started so long ago. After finishing my bachelor's degree, I was interested in teaching art- something I had grown to love. I knew I didn't want to be a classroom art teacher and began exploring options. I discovered art museum education and fell in love. Last summer I took a full-time job in art museum education, I was halfway through graduate school. Last month I finished my master's degree in art education. Paper Wings has been floating along in the background despite the declining time and effort I was able to put into it. Now that I am regaining the ability to think beyond my thesis, I see that my path continues to move away from Paper Wings. It is time for me to officially be done with Paper Wings and move on to the next chapter in my life.

I think about all of the amazing people I have met through this business- design teams, customers, friends, and especially those of you who I met in person at stamp shows and workshops. I thank each and every one of you from the bottom of my heart. I thank you for supporting this business and letting this mama have a dream job while raising babies. I still love teaching workshops and will continue to look for avenues to share my passion for creating art.

Everything at Paper Wings will start off at 25% off, this includes items already on sale. I will update inventory levels as often as possible. If you purchase something that is out of stock, I will refund your payment. The discount will continue to grow as the inventory dwindles. I do not have an official close date yet, but I hope to be done in the next few months.

Use coupon code GOING for 25% off your total purchase when you check out.

Here's a direct link to start shopping.

Please email or comment if you have any questions.

Kindly,
Carrie
Tuesday, July 10, 2018

DT: Texas Shaker Wall Hanging

Hi Scrappers,

This is Veronica from www.vickyscrappingpassion.blogspot.com  sharing with you a Texas themed wall hanging, I made for my husband's birthday:


This month, we took a summer break from the blog hop and decided to free post during the month.

I used:

For more details about how I made this shaker, please visit my blog and this SnapGuide  I prepared. Thanks

Some closeups:


I really like how this little tag is transformed with sentiment, the StazOn stamped map and the stamped gross grain ribbon.


I took a picture of this quote at the Lady Bird Botanical Garden in Austin, and I loved so much how well it goes with this stamps line.


I hope you enjoyed pages and visit my blog:  www.vickyscrappingpassion.blogspot.com to see more details and learn about all the fun techniques I used in these three pages.

Wednesday, June 20, 2018

DT: Galveston mixed media Minialbum

Hi Scrappers,

This is Veronica from www.vickyscrappingpassion.blogspot.com  sharing with you the final pages that made for my ongoing minialbum for one of the trips to Galveston:


I used:


3d zots 

Embossing powders, HeroArts, and an unknown from another kit (black sand)

Liquid Gloss, Ranger

Cardstock: Ranger nature coredination, CTMH, 
 mini-album by Heart of Texas
Glitter paste, BoBunny

and:


For detail about each technique I used to embellish these pages, please visit my blog.

The whole finished album:


I hope you enjoyed pages and visit my blog:  www.vickyscrappingpassion.blogspot.com to see more details and learn about all the fun techniques I used in these three pages.


Wednesday, June 13, 2018

Mini Album with Ruler Binding

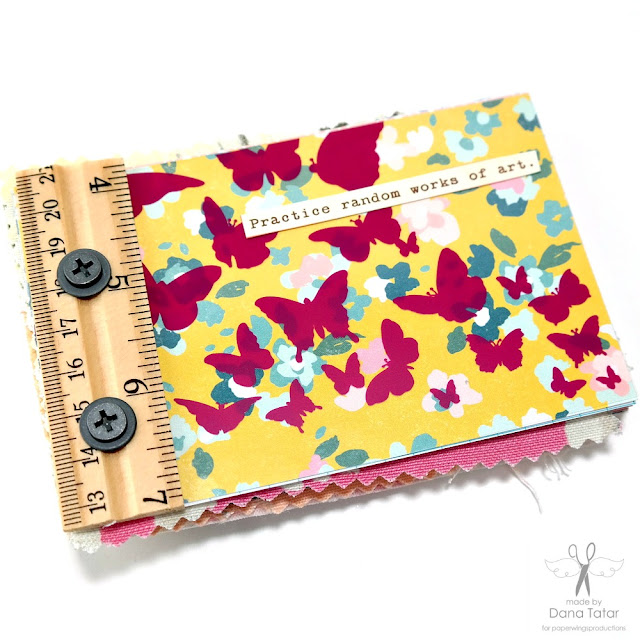
Mixed Media Patterned Paper abd Fabric Mini Album with Ruler Binding

Hi friends! Dana Tatar here today sharing a mixed media mini album that I put together. I usually struggle with album binding, so this Tim Holtz Ruler Binding set was a quick and easy way for me to hold my album together. The only tool necessary was a standard hole punch. (The metal screws, washers, and wing nuts are included with the rulers.)

Patterned Paper and Fabric Scraps Cut to Size for a Mini Album

I started this album by cutting up pieces of scrap patterned papers, clip art sheets, acetate, and fabric, to measure 3.25 x 5 inches. To add strength to the album, and to help keep the paper pages from tearing, I used acetate for the front and back covers.

Colorful Mixed Media Mini Album Pages with Stamping and Embellishments

I'm still working on embellishing all the pages in this album. I added handwritten song lyrics, stamping, chipboard stickers, and words cut from patterned papers, to the pages shown above. The fabric pages add fun texture to this album. I used a safety pin to attach a silver foil bird to a fabric page. Stitched beads or charms, or iron-on patches, would also make great embellishments for the fabric pages.

I gathered the punched pages together and placed them onto the screws to bind them together. The album is held together by wing nuts that twist onto the screws. I have 40 pages in this album and still have about 1/4 inch of space on the screws if I decide to add more pages at a later date.

Thanks so much for stopping by today!

Paper Wings Productions Supplies:
Big Textures Cling Stamp Set
Spring Flowers Clip Art Sheet
Silver Foil Bird

Pin It!


Mixed Media Patterned Paper abd Fabric Mini Album with Ruler Binding

Tuesday, June 5, 2018

June Blog Hop Winner

Congratulations to our June Blog Hop Winner-

I completed the blog hop and enjoyed all the creativity.


Please contact us at info@paperwingsproductions.com for instructions on how to claim your prize!

Thank you to everyone who participated!

Carrie

Friday, June 1, 2018

June Blog Hop


Welcome to the Paper Wing Productions Design Team June Blog Hop + Giveaway! The theme for the hop this month is Bright Colors. We hope you will hop along with us and find inspiration for your own projects.

If you complete the hop, you will be eligible to win a $25 Gift Certificate to the Paper Wings Productions Store!


For a chance to win all you need to do is:

  • Follow the Paper Wings Productions blog.
  • Visit each of the participating designer's blogs and leave a comment.
  • Leave a comment on the PWP blog telling us you completed the hop. 

To increase your chances of winning, like the PWP Facebook page and/or invite your friends to the hop. Be sure to leave a separate comment for each of your additional entries. The winner will be announced here on Tuesday, June 5th.


Let's get hopping! 

THANK YOU SO MUCH FOR JOINING US TODAY!

&

Let Your Creativity Take Flight!

Wednesday, May 23, 2018

San Antonio's Missions

Hi Scrappers,

This is Veronica from www.vickyscrappingpassion.blogspot.com  sharing with you a Picture frame, which I modified with san-antonio-missions-clear-stamp-set and  Building a Shrine cling stamps:


 This was a very easy project to do. I bought this frame a long time ago thinking about these pictures, we took when we traveled to San Antonio in 2006. The frame was a bargain i got in one of the discount stores. Thus, when I saw the Missions stamps from PWP, I immediately thought about this project.

In short, I cleaned the cobwebs and dust from the frame, and stamped the three corresponding missions on top of the glass using StanzOn. I distressed some chippies using a metallic paste to add some extra interest to the frame. I cut some squares of watercoloring paper to mat the pictures and stamped a border using the Building a Shrine cling stamps and some bronze ColorBox inks. Since, I can't stamp straight for the life of me, I used WeRMemmories stamping tool. To finish the images, I glued the mats to the existing images, added some titles using sharpies, and assembled the frames. And voila, the frame is more personalize and ready to be hung in one of my walls, finally.

Some other views:


The metallic paste gives the sentiments an amazing shine.


My stamping wasn't perfect, but good enough. barely noticeable once hung. 

BTW, I finished my mixed media painting: Yeah... Here, I wanted to share it with you:


the red lines bled through three more times, hopefully after sealing, gessoing them, paint again, it should be fine...


I used:
san-antonio-missions-clear-stamp-set, and Building a Shrine cling stamps
PWP

Shadow Box Frame,
Stanz On Ink, black
Bronze ink, ColorBox
Metallic Paste
Sentiment chippies, Blue Fern Studios
Watercolor Paper


I hope you enjoyed my canvas and visit my blog:  www.vickyscrappingpassion.blogspot.com.


Related Posts Plugin for WordPress, Blogger...